Read the event before planning the drive
Traffic Jam 3D presents Career, Infinite, Time Against and Free in its scenario menu. The verified first Career instruction concerns reaching checkpoints in time. The level screen also shows a vehicle performance requirement and later locked levels. Check the current event rather than transferring one opening instruction to every mode.
A distance target and a checkpoint deadline are different things to monitor. Identify the relevant display before beginning. This gives a movement decision a purpose: the next gap or lane change should fit the event, not simply look exciting in isolation.
Learn the car's response before choosing a narrow gap
The publisher documents WASD or arrow-key driving. Establish the response of a measured input before relying on it between nearby vehicles. From a cockpit perspective, a small-looking correction can still place the car close to another lane.
Look beyond the vehicle immediately ahead and reassess the space before the next correction. A gap is useful if approaching it leaves you able to understand the following situation. Committing to it without reading the continuation can turn one overtaking decision into several urgent reactions.
Combine the road view with the displays
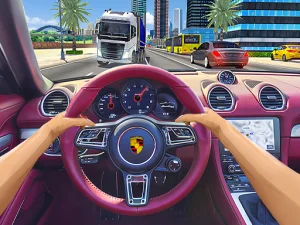
The verified drive interface includes speed, distance and the remaining time or route target. The inside-car view also has mirrors that help you notice surrounding traffic. Use those sources of information together instead of staring at a single vehicle while the objective changes around you.
Check the event's deadline without losing track of the road. If an approach became rushed, review whether you saw the relevant space early enough. More speed is not automatically the right response to a route that is already difficult to read. Notice which display actually explains the unfinished objective, then use that information to choose a practice goal instead of treating all result categories as equally important on every drive.
Interpret the result as several separate measures
The results screen distinguishes distance, speeding, close overtakes, opposite-lane time and mission completion. A positive value in one category does not prove that the mission itself was completed. Use the stated objective to decide what the result means.
Choose one issue for the next attempt. If the deadline was the problem, study the route decisions that delayed progress. If a crowded approach was difficult, reconsider how you entered that space. These are practical comparisons, not a universal strategy for every mode or level.
Use this collection to choose a traffic challenge
Other Traffic cards are separate destinations with their own driving or puzzle rules. Their names should not be treated as proof that they use Traffic Jam 3D's dashboard, modes or input scheme. Read each selected page before borrowing a key or assuming the same goal.
For a focused driving session, decide whether you want to understand one Career approach or explore another mode's actual instructions. Keep the vehicle and objective consistent enough to make a useful comparison between attempts. A clearer observation about the next gap is more valuable than chasing every result category simultaneously.
Before leaving, inspect the loaded player's pause and progress options. The tag does not establish common saves between traffic games. Choose Traffic Jam 3D for navigating its moving road environment, then let the selected event determine what counts as a successful drive.